
Anyway, out of curiosity, I tried to fixed 2 broken shadows (not my favorite, tho) using nail polish remover which contains Alcohol and FCO, and it seemed to work. Both shadows suck at pigmentation, but the pressing kinda helped with the issue, surprisingly. But for SN I want to do it properly. Tomorrow seems to be fun.
diy palettes
Re: diy palettes
All my pressing kit stuff just arrived (finally!). I forgot to get the rubbing alcohol, magnetic stickers, magnetic sheets, and parchment paper (to peel off the label using straightening iron); so I'll get them tomorrow and, most likely, will be spending the whole afternoon pressing shadows. That, if I can find those stuff in a short time though. I'm always puzzled how the customer service in stores here are so customer (UN)service! And people here just have no idea what 'rubbing alcohol' is. 
Anyway, out of curiosity, I tried to fixed 2 broken shadows (not my favorite, tho) using nail polish remover which contains Alcohol and FCO, and it seemed to work. Both shadows suck at pigmentation, but the pressing kinda helped with the issue, surprisingly. But for SN I want to do it properly. Tomorrow seems to be fun.
Anyway, out of curiosity, I tried to fixed 2 broken shadows (not my favorite, tho) using nail polish remover which contains Alcohol and FCO, and it seemed to work. Both shadows suck at pigmentation, but the pressing kinda helped with the issue, surprisingly. But for SN I want to do it properly. Tomorrow seems to be fun.

Re: diy palettes
Yay! How exciting  I hope it goes well for you!
You should try pressing just 1 SN shade first(your least favorite) just to see how it works out in terms of how much FCO you use. I find that it is best to use less rather than more, because with some shadows it makes them really hard(it really depends on the finish, matte shades need a lot less FCO or they will get too hard). So if you use less, and a couple come out too soft/powdery, you can always add more FCO and re-press them. But you can't take the FCO out if you used too much. So that's probably the biggest thing I have learned from my pressing experience.
Can't wait to hear out how it all worked out for you
https://www.youtube.com/user/Oxana124
http://swatchsoiree.blogspot.com
http://swatchsoiree.blogspot.com
Re: diy palettes
Back to report, ma'ams! Mission accomplished! Haha!!
I played 'pressing the shadows' half the day! LOL!
Unfortunately, since it's Sunday, most stores in town close, and the only ones open were the bigger dept store, but they have nothing I was looking for (adhesive magnetic sheets, etc. the tools for creating my freestyle empty palette). For that I was told to go to a craft store a bit to the edge of the town tomorrow. Let's hope they do have the stuff I need.
On to the pressing itself, I think it's safe to say it was a success! I fixed some of my broken shadows and pressed my pigments and loose shadows.
For the loose shadows I used the FCO and 96% alcohol. I recalled my recipe for Pâte brisée I usually make for my pies. Dry, add some fat (FCO), crumbly, add some water (alcohol), doughy (globby), transfer to pan. Some shadows easily became batter-y texture, but that was not a problem, tho.
I swatched several of them and, thank God, they feel like butter. Glide so easily on skin, and the colors look so intensified just like JenW's swatches over Stick 'Em, although the shimmers/sparkles are somewhat toned down a bit, (with all due respect to Karen) but that's exactly how I like them!
I tried to make sure that every SN shadow deserves its glory, because I know Karen isn't really keen on making pressed shadows. I think I did quite a fine job.
However, my full-size Model and Quartzite did not fill the pan all the way up, although the combos did okay.
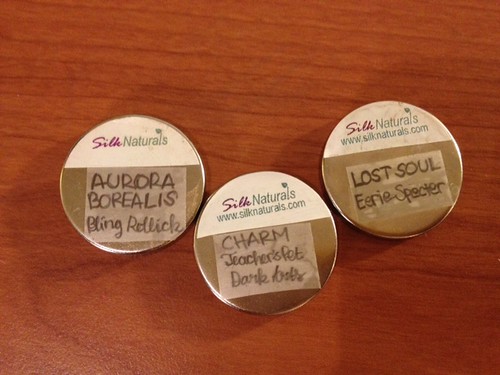
My only irk was that I just realized that my sisters ripped me off some of my favorites! Colt could barely fill half of the teeny-tiny triangular pan, and my gorgeous Specter (and it's GWP! ) looked like a stain in the pan together with Eerie.
I still have some more SN shadows to press. I'm want to prep some ideas for more good combinations first.
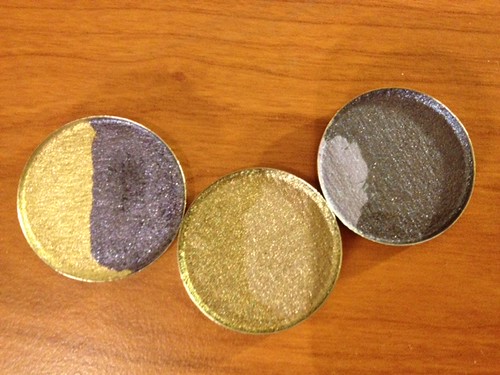
For the combos, I tried to name them heheh. Although Aurora Borealis is the name of SN kit containing those 2 shadows (Bling and Rollick). I love this combination the most.
End result.
The freestyle contain mostly aluminum pans so they don't stick. And I pried open the palette, the magnets were just dots at the designated spots where the pans suppose to sit. I need to find magnetic sheet immediately.
The SN's were only the little rectangulars and triangulars in the second pan; and the first two in the first column and whole second column in the first pan. The rest are depotted. You can see how clumsy and green I am as there are many nicks in the pans.


Thanks a lot Oxana and zus for the inspiration and the helps!!!
P.S.: I had my laptop at the end of the table the whole time with Oxana video tutorial playing over and over while I was 'playing' with the pressing kit and shadows.
I played 'pressing the shadows' half the day! LOL!
Unfortunately, since it's Sunday, most stores in town close, and the only ones open were the bigger dept store, but they have nothing I was looking for (adhesive magnetic sheets, etc. the tools for creating my freestyle empty palette). For that I was told to go to a craft store a bit to the edge of the town tomorrow. Let's hope they do have the stuff I need.
On to the pressing itself, I think it's safe to say it was a success! I fixed some of my broken shadows and pressed my pigments and loose shadows.
For the loose shadows I used the FCO and 96% alcohol. I recalled my recipe for Pâte brisée I usually make for my pies. Dry, add some fat (FCO), crumbly, add some water (alcohol), doughy (globby), transfer to pan. Some shadows easily became batter-y texture, but that was not a problem, tho.
I swatched several of them and, thank God, they feel like butter. Glide so easily on skin, and the colors look so intensified just like JenW's swatches over Stick 'Em, although the shimmers/sparkles are somewhat toned down a bit, (with all due respect to Karen) but that's exactly how I like them!
I tried to make sure that every SN shadow deserves its glory, because I know Karen isn't really keen on making pressed shadows. I think I did quite a fine job.
However, my full-size Model and Quartzite did not fill the pan all the way up, although the combos did okay.
My only irk was that I just realized that my sisters ripped me off some of my favorites! Colt could barely fill half of the teeny-tiny triangular pan, and my gorgeous Specter (and it's GWP!
I still have some more SN shadows to press. I'm want to prep some ideas for more good combinations first.
For the combos, I tried to name them heheh. Although Aurora Borealis is the name of SN kit containing those 2 shadows (Bling and Rollick). I love this combination the most.
End result.
The freestyle contain mostly aluminum pans so they don't stick. And I pried open the palette, the magnets were just dots at the designated spots where the pans suppose to sit. I need to find magnetic sheet immediately.
The SN's were only the little rectangulars and triangulars in the second pan; and the first two in the first column and whole second column in the first pan. The rest are depotted. You can see how clumsy and green I am as there are many nicks in the pans.
Thanks a lot Oxana and zus for the inspiration and the helps!!!
P.S.: I had my laptop at the end of the table the whole time with Oxana video tutorial playing over and over while I was 'playing' with the pressing kit and shadows.
Last edited by frckls on Mon Dec 12, 2011 1:26 pm, edited 1 time in total.
Re: diy palettes
Pressed shadows swatches
*The pictures don't give enough justice to the shadows. The lighting in my room sucks BADLY, even though I have 5 lamps in my tiny studio. Being in the corner room doesn't help much either.*
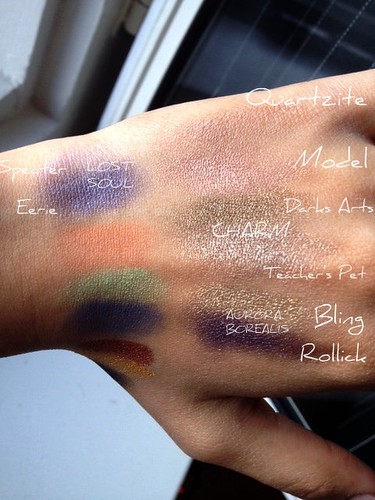
Quartzite is almost an exact match to my skin, so it doesn't show up that well. While Model's beautiful finish is hard to capture with my camera phone. As for Specter, my middle finger is too big to reach it.
A little bit dark, so they look a little bit less vibrant than in real life.
*The pictures don't give enough justice to the shadows. The lighting in my room sucks BADLY, even though I have 5 lamps in my tiny studio. Being in the corner room doesn't help much either.*
Quartzite is almost an exact match to my skin, so it doesn't show up that well. While Model's beautiful finish is hard to capture with my camera phone. As for Specter, my middle finger is too big to reach it.
A little bit dark, so they look a little bit less vibrant than in real life.
Re: diy palettes
Your pressed shadows look awesome! Great job!
I too find that sometimes shimmery ones can become more pearly when pressed, but I prefer a pearly or metallic finish also.
I too find that sometimes shimmery ones can become more pearly when pressed, but I prefer a pearly or metallic finish also.
https://www.youtube.com/user/Oxana124
http://swatchsoiree.blogspot.com
http://swatchsoiree.blogspot.com
Re: diy palettes
Well, thanks to you, Oxana. And zus for the marvelous inspiration as well.
Re: diy palettes
That looks great! You make me want to buy some new colours now, sigh  I'll try to have some FCO at home before I do though, because I am really curious to try it.
I like how you named your combinations, that's fun.
I like how you named your combinations, that's fun.
Re: diy palettes
A reminder for any of you who want to press Eyelight shadows.
I swatched both the pressed Model and the loose one (I haven't cleaned the jars so there were some leftover dusts) last night. I have to say that the finish altered a bit. The loose one was lighter in color and the pressed one was deeper in color. And as I said before the finish somehow became more pearly rather than the usual shimmery, although the pressed version still retained its duo chrome finish.
I will buy another jar of Model just because I'm so deeply in love with this color and want to have both version. I might do the same with Magpie and the other ELs as well. Or maybe just press half the content of the jar.
Re: diy palettes
From the Valentine's Day thread:
If you are going to start pressing, just remember less is more. The only time I really screwed something up is when I added too much FCO and the product turned out rock hard. There's no way to fix that. So add very little, and if it is too soft you can always break it down and add more. I add FCO and then rubbing alcohol. The alcohol is needed to get the product wet since you only add a tiny bit of FCO it will not saturate the product. The alcohol all evaporates out though, so you don't have to worry about it getting on your face. There's lot of great info on this thread, so hope it all helps you
I have used several binders. I started with a non-natural silicone based binder called EZ Prez. It worked just fine, and I only pressed eye shadows with. I then tried jojoba, but got worried about it going rancid, and also I break out really badly from jojoba, so I could only use it in shadows. When I finally tried FCO I was in love. I like the silky texture it gives, and I like how natural it is. My skin is very breakout prone, and I have been pressing all my face makeup with FCO and it has never broken me out. It is a very light non greasy oil, much lighter than jojoba.rfnandkcn wrote:Oxana:
I think your idea of a pressing kit is genius! I have read your posts about pressing shadows and make up and have wanted to try myself, but find myself intimidated. I have read other blogs about pressing, and there is so much conflicting information as to what is the best thing to use as a binding agent. I know that there are commercially available bottled binding agents, but they all seem to contain dimethicone, which I am allergic to. Some mention using alcohol. Some have mentioned jojoba oil, but I think that can turn rancid. I know that you use FCO, but that makes me nervous as well. I have sensitive skin, and if someone looks at me cross eyed my skin can break out! Is FCO the only binder you have used, or was that your binder of choice after trial and error?
Also, where is the best place to get the little tins and cases?
Thanks!!
If you are going to start pressing, just remember less is more. The only time I really screwed something up is when I added too much FCO and the product turned out rock hard. There's no way to fix that. So add very little, and if it is too soft you can always break it down and add more. I add FCO and then rubbing alcohol. The alcohol is needed to get the product wet since you only add a tiny bit of FCO it will not saturate the product. The alcohol all evaporates out though, so you don't have to worry about it getting on your face. There's lot of great info on this thread, so hope it all helps you
https://www.youtube.com/user/Oxana124
http://swatchsoiree.blogspot.com
http://swatchsoiree.blogspot.com
Re: diy palettes
As for pressing kits (tins and stuff, even freestyle palette), you can get it at TKBtrading.
Rubbing alcohol from local drugstore.
I got one UNII palette tho. Kinda expensive but very handy for traveling as I can fit basic shadows, eyeliner, brow pencil and a brow brush.
Other palettes I got off eBay. I got 12-round pans palette for $3 each.
Rubbing alcohol from local drugstore.
I got one UNII palette tho. Kinda expensive but very handy for traveling as I can fit basic shadows, eyeliner, brow pencil and a brow brush.
Other palettes I got off eBay. I got 12-round pans palette for $3 each.